
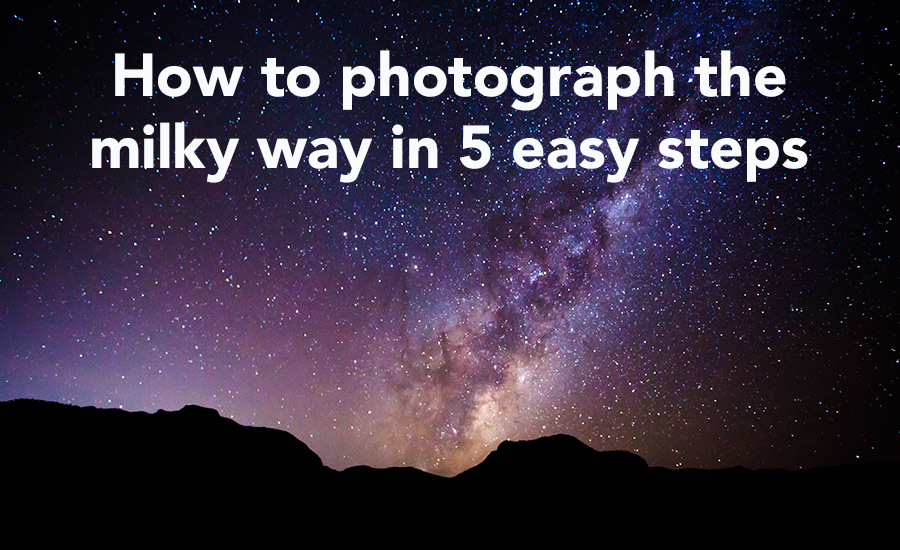
I have always wanted to know how to photograph the Milky Way and last night I had the pleasure. I was very excited when two photography friends invited me on a little adventure out into the middle of the woods at 9:30pm at night. Doesn’t sound creepy at all does it?! We travelled up to the Glasshouse Mountains here in Queensland to perch ourselves in front of Mt Coonowrin as the Milky Way was due to be around that vicinity. Luckily enough it was sitting to the left of the mountain. As I have never done any astrophotography before, (I have only read how to do it, which was completely confusing) I had Scott’s experience to help me out as he has been doing astrophotography for the passed 5 years.
Equipment
- DSLR Camera with Manual Function
- Wide Angle Lens
- Sturdy Tripod
- Shutter Release
- Torch or Head lamp
First of all, once you’re in location set up your camera on your tripod. Its good to have a lens that has a wide aperture like around F2.8 but I only had my wide angle lens with me which is a 17-40mm F4. I wasn’t worried though because I knew my Canon 5D Mk III could handle a high ISO to compensate and I was secretly curious to see how well it would perform!
1. ISO
Set your ISO to something around 3200. I set mine to 6400 because the widest my aperture would open was F4. If you had a lens that opens to F2.8 then you only need to crank the ISO to about 3200. This is so your camera sensor can capture as much detail in the night sky as it possibly can.
2. Camera Mode
You need to set your camera to the Manual setting so that you can have full control over the settings you are using.
3. Aperture and Shutter Speed
If you are using a wide angle lens which is the best lens to use for astrophotography shots, set your aperture to the widest aperture that you lens has, something like F2.8. Set your shutter speed to 30 seconds. If you are using a prime lens like a 50mm the shutter speed will be around 12 to 15 seconds.
4. Focusing
Turn your focusing from Auto to Manual on your lens. Set your camera to Live View. Open your lens to the widest length. Turn your focus control all the way to the left so that you are on Infinity (which is the little sideways 8). Point your camera at a really bright star in the sky and try to find it on your screen. If you are having trouble finding it, zoom in to x5 by pressing the button with the magnifying glass on it. You should be able to spot something now, so zoom in to x 10 by pressing the magnifying button again. Once the star is really visible move your focus ring slightly left and right and watch the star go in and out of focus, when you see it really sharp, leave your focus ring there and don’t touch it again unless you change locations. You can move your camera around in different directions on your tripod but try not to bump the focusing ring. You will need to refocus if you move a fair distance from where you first focused, otherwise you should be all good.
Since writing this blog I have been shown a new way to focus which is much much easier and quicker. Have your focus on manual, turn the focus ring all the way to the left so that you are on the Infinity symbol then bring the focus ring back about 2mm to the fist line you see on your lens. This should give you focus overtime. After taking a few pics, zoom in on one of them just to make sure you are in focus. Simple!!
5. Shutter Release Cable/Remote Shutter Release
Plug in your Shutter Release cable, start clicking away and watch the magic happen.

It really is a fun way to spend the night and I look forward to some more night sky photography adventures especially while I am road tripping around USA and Canada soon. A big thanks to Scott from Scott Bourke Photography for being a great teacher and making it so simple for myself and Lisa to learn. Unfortunately we didn’t capture any shooting stars although we saw a lot. Theres alway next time though!
Did you enjoy this article or do you have any other tips when it comes to photographing the Milky Way? I would love to hear your thoughts so leave a comment below. 🙂

Hey Larissa, Nice work and well done!
I did a series on my blog with a few other tips that you might be interested in, such as planning tools etc. Especially if you are wanting to get some awesome shots in North America 🙂
Here’s the link.. http://karllindsayphotography.com/blog/2013/04/how-to-take-stunning-night-photos-1
Thanks Karl! I look forward forward to reading your blogs. I need as much info as i can get before my big trip! 🙂
Wow – I have read a few astrophotography tutorials – and still yet to try it out (would need to drive a fair way from where I live in the city). But I’m dead keen to try it now and your tutorial is by far the simplest tutorial I’ve read. I cant believe you got such incredible shots on your first outing – impressive!!
Thanks so much Meghan! I wanted it to be simple because every other blog I’ve read about it was so technical! I drove about an hour out of Brisbane to get this. Somewhere nice and dark is ideal! I can’t wait to see what you capture!
how do you Locate the Milkway in the Sky at Night ?
An app called Stellarium is apparently good Mahmoud. I haven’t used it yet because luckily I was with someone who had worked out where the Milky Way was going to be. Another app that I have on my phone is Ephemeris but I find it really confusing to use!
Beautiful photo Larissa, thank you for writing this post on capturing the Milky Way. I was wondering how many shots you take, just one every 30 seconds? Or do you layer multiple images in Lightroom ? Thanks! Aimee
Hi Aimee, thanks for your question. I take one shot every 30 seconds. Its amazing that you can capture all that detail in 30 seconds but you can! Happy Shooting! 🙂
Hi Larissa, can you recommend any spots in South East Queensland or northern NSW that would be suitable. I’m not sure where to find a spot without too much light pollution. Also, would you mind sharing what camera and lens you used for these. Cheers.
Hi Ngaire, a great spot in South East Queensland is Lake Moogerah. It gets really dark out there because it is 2 hours from Brisbane. Basically anywhere at least two hours from a town or city should give you enough darkness. You need to use the widest lens possible. My set up is a Canon 5D Mark 3 with a 16-35mm F2.8 lens. I used to use a 17 to 40mm F4 lens previously though with no dramas!
I’m a beginner in photography and having a Canon eos 1000D so what should be my camera settings for taking pictures of milky way ?
It depends on your lens Priyank but basic settings are ISO 6400 at 30 seconds with your lens open to the widest it can go. Either F4 or wider if possible! You can’t really go longer than 30 seconds or the stars will start to become streaks instead of dots. 🙂
Hi Larissa, I did my first astrophotography workshop on the weekend and now I’m hooked. I live at Caboolture and glasshouse mountains isn’t too far from here I will have to give it a try. (I went out to a farm at Woolooga). I loved your tutorial, thanks for making it so simple to understand.
Hi Gayle,
Im so glad you enjoyed the blog and are addicted to astrophotography. Its really amazing that we can capture such beautiful images of the night sky with our cameras these days! 🙂