Part 3 of my 3 Part Series of Basics of Photography is about ISO. ISO is the third point on our Exposure Triangle. The other two being Aperture which I talked about here and Shutter speed which I talked about here. So lets start with the definition of ISO.
What is ISO?
ISO is your cameras sensitivity to light. So the lower the ISO number you choose, the less sensitive your camera is and the finer the grain. If you choose a high ISO number then your camera will be very sensitive to light and there will be lots of grain in the photo that you have just captured. You should always try and keep your ISO as low as possible to avoid any extra noise or grain in your shots.
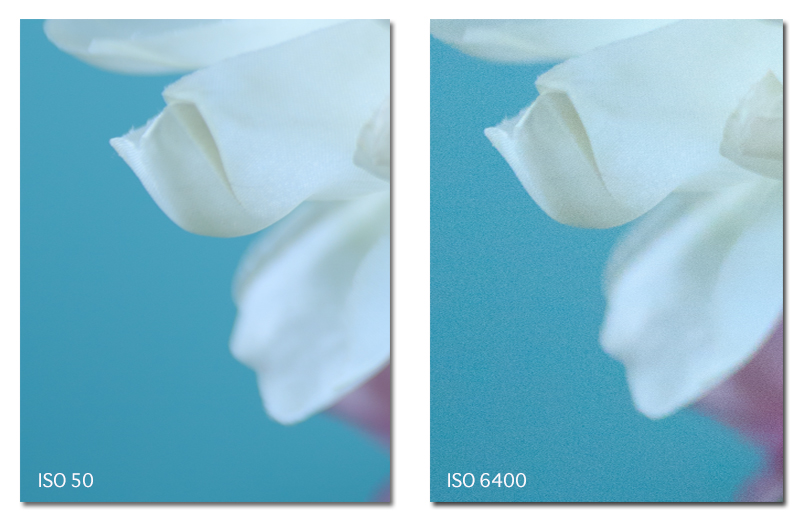
You can see in the above picture that the image at ISO 50 doesn’t have any visible grain or noise compared to the image taken at ISO 6400. This is a picture of a flower zoomed in so that you can see the difference which is quite noticeable.
The range of ISO numbers are as follow: ISO 50, 100, 200, 400, 800, 1600, 3200, 6400 and so on. If you choose ISO 200 that means that you are doubling the amount of sensitivity of ISO 100. An example of this is if you were shooting a seascape at the beach with some filters on, which was giving you a meter reading of 30 seconds and you only wanted to spend 15 seconds on that shot because the colour was fading out of the sky really quickly then you would double your ISO from 100 to 200 to cut the exposure time in half but you are risking a little extra graininess within that shot. I usually keep my ISO anywhere from 50 to 200 unless I am shooting the milky way.
When would you use a Higher ISO?
As I said above, when there is plenty of light around you should always use the lowest ISO that your camera is capable of but there are times when you need to increase it like if you were trying to capture milky way shots which you can read about in my 5 easy steps to photographing the Milky Way guide. Or if you were trying to photograph something that was fast moving like a sports game that was indoors with low light. Higher ISO settings are generally used in darker situations to get faster shutter speeds.
If you want a faster shutter speed without changing your aperture setting then you would increase the ISO instead.But you have to remember that the higher the ISO the more noise and grain is introduced into the image so it can be a bit of a juggling act.
ISO adjustments should always be your last resort. Always choose your aperture and shutter speed for the situation first before increasing your ISO. Only ever increase your ISO if you can’t open your lens up any wider or want it set to a certain aperture and you can’t get your shutter speed fast enough for the type of shot you are trying to capture.
It is alway best to take control of your camera by using Manual Mode rather than leaving it up to the camera to decide your settings. Once you have a handle on the 3 pillars of exposure: Aperture, Shutterspeed and ISO you are halfway to becoming an amazing photographer. And remember that practice is the key. So get out there and start practising. The more you practise the more you will learn what your camera is capable of and you will really start to enjoy taking photos.
I hope you enjoyed this 3 part Series: Back to Basics and I hope it all makes sense to you. Don’t forget you can leave a comment below if there is anything you would like to add or any questions you would like to ask. I am always happy to hear your feedback. 🙂


One thought on “Basics of Photography: Understanding ISO”