
It’s been six months since our USA/Canada trip so I thought it was high time I got a little video done. This a tradition of mine whenever I go on a trip. I like to create a video with photos and music because its so nice to look back at your trip and remember the awesome fun that you had and the amazing things you saw. Today I want to show you a quick and easy way to do it. You can do this in Lightroom but I find it so much easier to do it through iPhoto. Its about time iPhoto came in useful for something right! 🙂 Let me show you How I create a photo video with iPhoto:
Firstly create a folder with all the photos that you want to put into your slideshow/video. How I do this is by creating a folder on my hard drive like “Road Trip USA” for example. I then go through all my photos in Lightroom and export them into that folder.
To create Slideshow/Video
- Open Iphoto
- Click on File – New Album (and create an Album with the same name i.e Road Trip USA
- Click on File – Import to Library
- Find the folder where you exported all your photos from Lightroom, highlight all photos and click Import.
- Once they have all been imported into iPhoto, select them all by clicking “Cmd A” (there should be a yellow box around every photos) and drag them into the folder that you created under “Albums”. Once in that album you can sort them into the order of how you want to view them in your slideshow, unless you just want them to be random.
- While you are in that album – Click on File – New Slideshow
- This will automatically put all those photos into a slideshow for you.
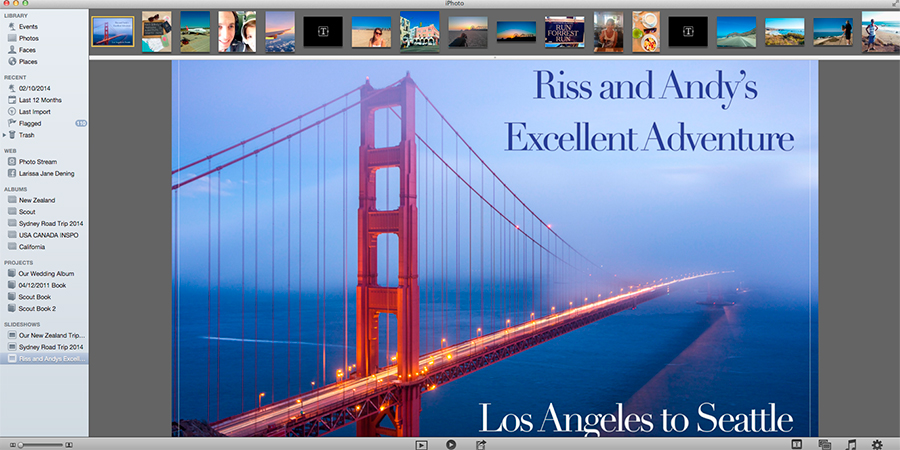
- You will see all the photos along the top bar like in the photo above. If you need to change the order of them just click on a photo and drag it to the position that you want it to be.
- If you want delete a photo, just highlight it so it has a yellow box around it and hit delete on the keyboard.
- If you want to add more photos, then complete steps 3 to 5, then highlight those photos and drag them down into you slideshow under the SLIDESHOW option in the lefthand menu bar.
To add text:
- You can add text to whichever photo that you like by clicking on the photo that you want the text to be on and then clicking on Text Slide in the bottom right hand corner. Once you have typed your text, if you want to change font, size or colour – select the text and right click and the options will come up.
To add music:
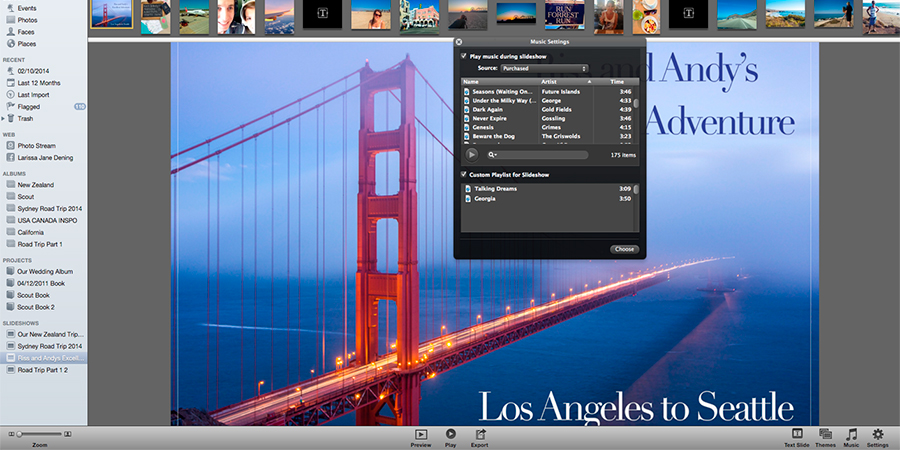
- Once you have compiled your slideshow, click on the Music button in the bottom right hand corner. You will have the option to choose your own music or the music that comes with the themes. Tick the checkbox against “Play music during slideshow” then find the song(s) that you want to use from the drop down list next to Source, highlight the song(s), then hold and drag it to the bottom area underneath where is says “Custom playlist for Slideshow”. Tick that box then click on Choose.
Speed of slides:
Lastly you can have complete control over how the slides appear/disappear from the screen, and at what speed. I like to choose the Ken Burns theme under the Themes tab. Under settings I tick “Fit slideshow to music”. These are the easiest and quickest options and seem to work well for what Im doing but you can always tailor it to your own liking by choosing other themes etc.

Once you have selected all your setting, click on the play button and preview your slideshow.
Exporting:
Once you are happy with it, you can export it to your computer so that you can view it on iPad, computer, tv or upload to Youtube.
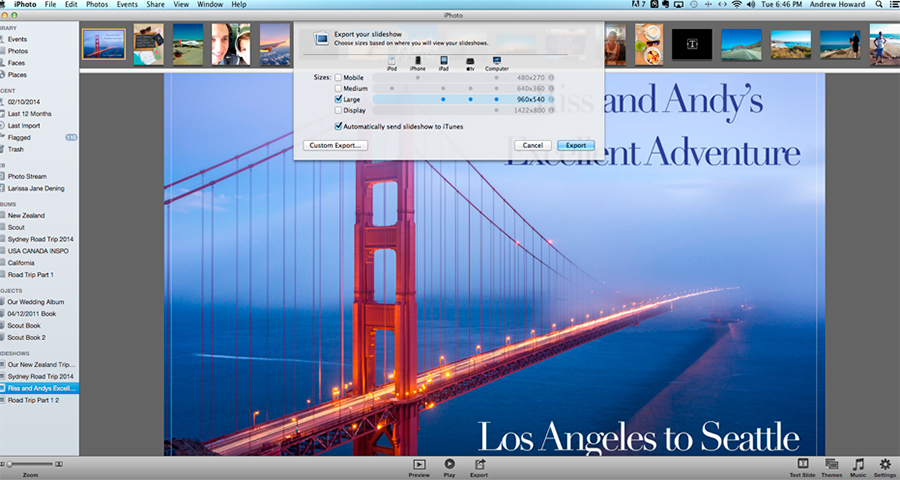
- Click on Export
- Choose the size you would like to export at. I always choose Large so that is good quality.
- Then choose where you want to save it too.
- Click Ok and wait for it to export.
- It can take up to an hour depending on the size of the file.
Pretty easy right! If you want to watch the movie that I just made you can do so below! Did you find this tutorial helpful? If so, let me know in the comments below. 🙂


Wow looks like a great holiday! The video montage is such a great idea – awesome way to remember a holiday!
Thanks so much Andrew. I love having these to look back on. And its so quick and easy to put together with iPhoto!
That is so cool and seem so simple. i can’t wait to try it out with some of my travel photos. Thanks heaps for sharing this article Larissa!
YAY! So glad that this article has come in handy for you Kiki! Its so quick and easy! 🙂
Oh I loved it. Your video allowed me to travel with you both. Music was great too. All the waterfalls were wonderful. May I also say you are a gorgeous looking couple. Thanks again for sharing. 🙂
hahaha, thanks so much Susan! So glad that you enjoyed it! x 🙂
This is so clever, I love handy tech tips like this! I recently had to take a whole bunch of old photos out of iPhoto and onto a hard drive become iPhoto was running slowly and I never used it so I often find I am lacking iPhoto skills when I go into the application now! Thanks for sharing Lariaa! Kate, Wondrous
My pleasure Kate. Im glad you found it useful! I never use iPhoto except for this function! haha. Poor old iPhoto. Basically I just import the photos for the video and thats all. x
Hello, Gorgeous photography AND an amazingly useful post! Loving both and so thank you so much….I will need to read your instructions several times over until it sinks in – but look out world here come my super, doper image montages! x
Hi Monique! Thank you so much for the lovely comment. Im so glad that this will come in handy for you! I love having little videos to look back on! Its so worth it once its done. 🙂
Wow! Great video thanks so much for sharing your holiday!
great post!
Thanks so much Sheila! 🙂